As far as the UX of an app is concerned, it is much easier to navigate to other sections of an app if the navigation panel is located at the bottom. For adding this functionality to an app, developers of React native app development company build a bottom sheet and add a different section to the sheet. Considering React Native framework and its third-party library support is a great way to start with. React Native developers easily add the bottom sheet using the components imported from a third-party plugin react-native-raw-bottom-sheet.
Before getting into the codebase, we have to complete different tasks that as setting up the environment and others. Let’s check this step in detail.
RN Environment Setup
This is the crucial step that you cannot miss if you are starting new to React Native app development. It is like getting familiar with the environment. Your system needs the same familiarity. It is possible only when you install specific software.
Here, we have selected Windows and Android OS to build our project. So, you have to install JDK, Node, Android Studio, and VS Code editor. Also, you have to get the React Native CLI.
There are two tools to build a React Native project. The first one is Expo Go and the other one includes React Native CLI.
As React Native CLI gives much more flexibility, we have opted for this tool and not the Expo Go tool.
So, install all these tools and move forward with the next steps.
Building a simple template for the project
A simple template is much required for an RN project. This is where you have to add the codebase and execute the program later. Let’s learn how can you build the template.
Create a folder in any drive in your system. Let’s say you prefer to build the folder in C drive. Build the folder and name it a specific name. For example, it is RN_Project. Open a terminal from this RN_Project folder and pass npx react-native init Bottom-Sheet — version 0.71.3.
Note that we will be working with 0.71.3 version of React Native. The name of the project is Bottom-Sheet.
Hit enter and a simple template Bottom-Sheet will be created in the RN_Project folder.
Third-party Plugin installation
Installing a third-party library is what will make the project-building process much simpler and less time taking. Here, we have to get the react-native-raw-bottom-sheet. Run the command npm i react-native-raw-bottom-sheet in your project terminal. You can do it in the VS code editor. Later you will notice that the code imports RBSheet from this library. You can customise this RBSheet and make the bottom sheet interactive to the user’s needs.
With this third-party component, you can develop the bottom sheet for both iOS and Android OS.
Now we can move forward with the codebase formation.
Getting started with the codebase

The first thing that you have to consider while creating a codebase for your React Native project is to list down the components both built-in and third-party. As you can notice, we have used the built-in components such as Button, View, StyleSheet, and Text from react-native library.
Also, we have used the useRef hook to make a mutable reference that exists between rendered components. Lastly, RBSheet is used from the third-party library “react-native-raw-bottom-sheet“. RBSheet provides a customizable and simple bottom navigational sheet component. It is used to display content similar to a modal component. It has accessibility support, full-screen support, customizable animations, and interaction handling.
So, if you want to get the bottom sheet components and design them as per your requirements, you should use the “react-native-raw-bottom-sheet“.

The first line of the codebase in image 2 exports the default function App. it considers the ES6 modules syntax.
There is a useRef() hook linked with a constant refRBSheet. It creates a reference to the third-party component RBSheet. With this reference point, you can use the RBSheet anywhere in the codebase.
A View element is rendered with styling elements added to it. It has a specific flex value, which indicates the space occupied by the main container. It has a centered alignment of items and the content is justified at the center. The background color is black.
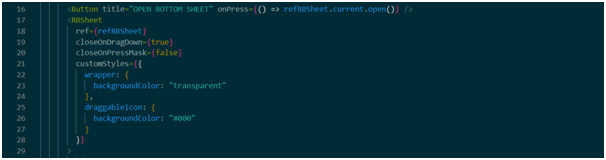
Here is the button clicking which will open the bottom sheet. It has some text elements “OPEN BOTTOM SHEET“. An event handler onPress is used with the button. It acts as the property to get the callback function refRBSheet.current.open().
There are other properties added to the ref. These are used to customize the bottom sheet functionality.
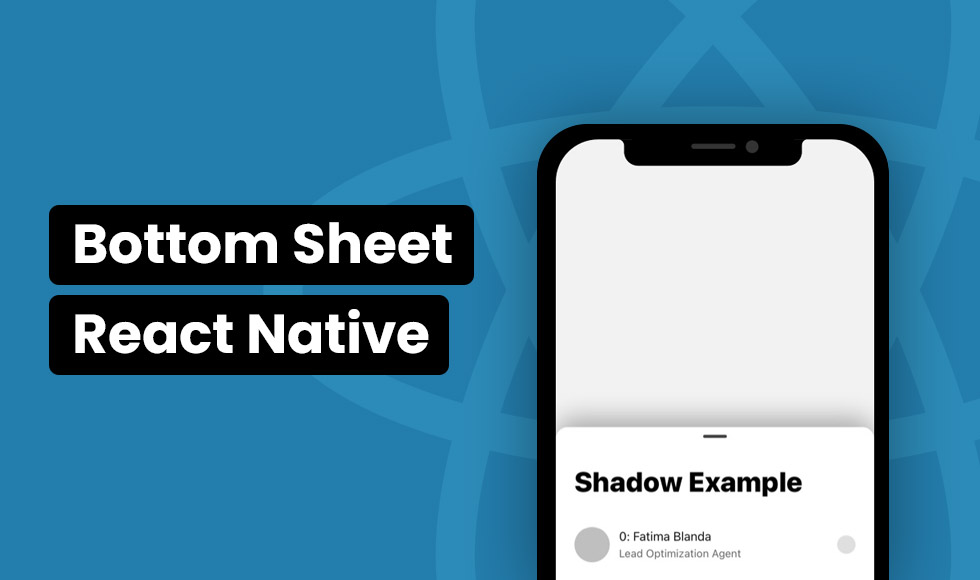
When user clicks on the blue button, it opens the bottom sheet whereas users can close the bottom sheet by dragging it down. The property of closeOnPressMask is set as false.
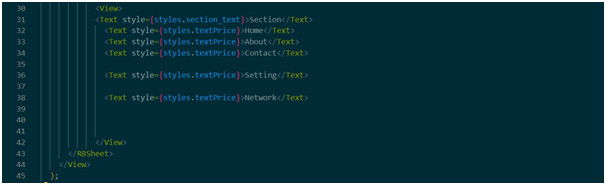
This part of the codebase is about adding sections to the bottom sheet. It has 6 text elements namely Section, Home, About, Contact, Setting and Network. There are styling objects added to it which will give them unique alignment, color, font size and others.
Going forward, lose all the tags , and .
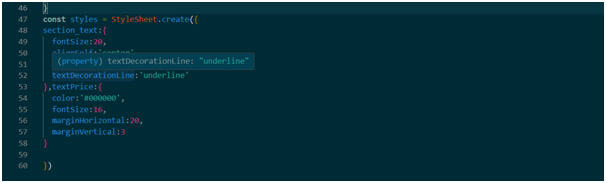
This is the styling part. Two styling objects are added. The first one is section_text. It is used for the title ‘Section‘ and the second one is the textPrice. This object is used for the ‘Home‘, ‘about‘, ‘Contact‘, ‘Setting‘ and ‘Network‘. You can add as many properties you like to add in your styling objects.
So, we have successfully completed the codebase. Let’s see what the next step is.
To run the program on the emulator
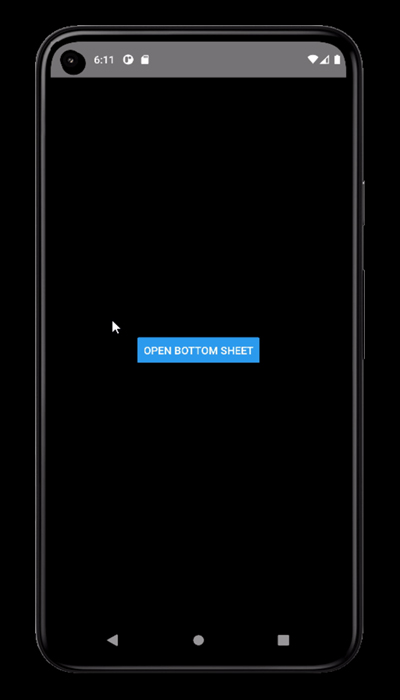
There is the step remaining to check if we have correctly framed the codebase. For this, create a new terminal in the VS code editor. Note that it has to be from our project. Run npm install on it. Then run npx react-native run-anddroid on it. These are the two commands that will enable you to start the project on the emulator. Image below gives the output of the project that we have built so far.
Hope you have learnt the steps of adding a bottom sheet in your React Native app.